Overview
The purpose of this post is to establish ourselves with a working environment geared towards development on ASP.NET Core 1.0 through Visual Studio 2015. I will walk through creating an Angular2 Single Page Application with MVC 6, Web API 2 and TypeScript. The sample application is available here on my github page.
A quick nod of approval before we get started
As a community of early adopters it is gratifying to see collaborations betwixt Microsoft and Google, finally “we can all get along”.
- Angular2 is built with TypeScript
- Visual Studio Code is built on Chromium.
These collaborations are exciting and certainly influential – my only hope is that we see more of these collaborations and other large industry leaders follow their example!
Prerequisites
There are several things that you’ll need before we dive into writing code. We should take a moment to familiarize ourselves with some of the new core concepts as well as ensuring that we have our IDE correctly installed and configured.
Install Visual Studio 2015
 It all starts with your favorite IDE, mine being VS (of course, if that wasn’t obvious). You can download the community version of it here. The nice thing about the community version is that it is entirely free! Once you have it installed you’re ready to begin setting up your web solution. Finally, as a prerequisite you should at the very least be familiar with .NET MVC.
A few noteworthy mentions
project.json
The project.json is the replacement for the *.csproj file. The main difference is the file format – you’ve probably been noticing the shift away from XML and the movement to the preferred JSON format as it is superior.
wwwroot
The wwwroot folder now acts as the directory in which your web site will be served from. Instead of your entire solution directory acting as the file structure, now this single folder and its sub directories act as the root of the application.
npm
![]() While Node.js and its corresponding package manager, namely “npm” are part of the install for Visual Studio 2015 – it installs with
While Node.js and its corresponding package manager, namely “npm” are part of the install for Visual Studio 2015 – it installs with 1.4.9 which is unfortunately an outdated version . Angular2 might play nicer with a later version of npm.
” Node.js’ package ecosystem, npm, is the largest ecosystem of open source libraries in the world!
Let’s address this now, so that we do not run into issues once we start writing code. Install the latest version of Node.js here. Once installed navigate to the following directory:
C:\Program Files (x86)\Microsoft Visual Studio 14.0\Common7\IDE\Extensions\Microsoft\Web Tools\External\
Open the npm.cmd file in your favorite text editor (running as Administrator) and replace the contents of this file with the following:
@"C:\Program Files\nodejs\node.exe" "C:\Program Files\nodejs\node_modules\npm\bin\npm-cli.js" %*Now Visual Studio 2015 will utilize the npm version that was installed from the aforementioned steps.
ASP.NET Core 1.0
At this point you are probably wondering, “what is ASP.NET Core 1.0 and what happened to ASP.NET 5?”. These are both great questions, and to answer them ASP.NET 5 has been renamed more appropriately. Since it was completely rewritten from the ground up, why not rename and version it? For the remainder of this tutorial, if you happen to see reference to ASP.NET 5 think of it as ASP.NET Core 1.0 and use them interchangeably for now. But don’t take my word for it, check out Scott Hanselman’s post “ASP.NET 5 is dead“.
” ASP.NET 5 is a new open-source and cross-platform framework for building modern cloud-based Web applications using .NET.
.NET 4.6.*
With .NET 4.6 you get C# 6. C# 6 is something that I have personally been looking forward to. I’m not sure I share the same level of excitement as I did with .NET 4.5 and its asynchronous programming model support, but excited nonetheless! Additionally, we are now going to start harnessing ASP.NET Core 1.0.
” ASP.NET 5 applications are built/ran using the new .NET Execution Environment (DNX), and every ASP.NET 5 project is a DNX project.
DN*
DNX is an acronym that stands for .NET Execution Environment. It is basically just an SDK within the context of Visual Studio, but also acts as the runtime environment in which your ASP.NET Core 1.0 applications execute.
Accompanying DNX is the DNU and DNVM CLI’s.
- DNU, .NET Utility
- DNVM, .NET Version Manager
For more details on these command line interfaces please visit here.
Code
We should be familiar enough with some of the core concepts such that we can finally begin by creating a new ASP.NET Core 1.0 web application. From within Visual Studio 2015, select File → New → Project. Then from within the New Project dialog navigate and select Installed → Templates → Visual C# → Web → ASP.NET Web Application – select “Ok”.

Visual Studio 2015 now groups templates by .NET Framework version, notice ASP.NET 5 applications are separated and beneath .NET Framework 4.6.1. Additionally, notice when you select the ASP.NET 5 templates that the MVC and Web API check-boxes are disabled – the reason being that they are now unified in ASP.NET Core 1.0.
Personally, I’m thrilled that there is no longer a need to have Web API controllers inherit ApiController and MVC controllers inherit Controller – more about this later…
” There can be only one.
Yes, that is a Highlander reference! But it’s actually appropriate because there should be only one Controller – not to mention the seemingly countless other duplicate classes that overlapped with System.Web.Http and System.Web.Mvc.
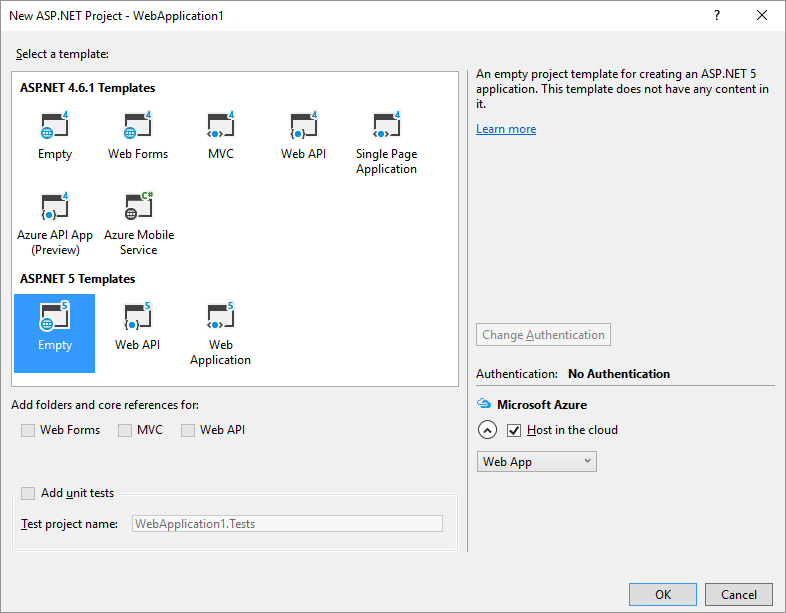
Select the “Empty” template, and let’s continue – your solution should now resemble the figure below:
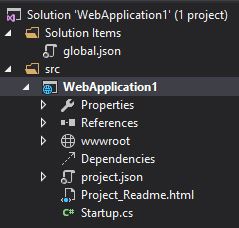
We can delete the Project_Readme.html file as it is not needed. Now let’s add some standard MVC scaffolding, you should have the following for our starting point:
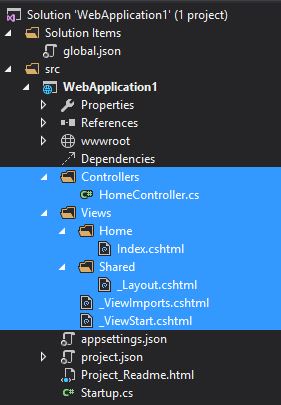
All that is needed from the previous step was the folder structure and several built-in templates.
| Folder | Add New Item Step |
|---|---|
| Controllers | DNX → Server-side → MVC Controller Class |
| Views | DNX → Server-side → MVC View Start Page |
| Views | DNX → Server-side → MVC View Imports Page |
| Views\Home | DNX → Server-side → MVC View Page |
| Views\Shared | DNX → Server-side → MVC View Layout Page |
Of the multiple items we have added at this point, there are only three that we need to alter from the default template provided. First the _ViewImports.cshtml, it should resemble the content below – and simply enables tag helpers.
| @using WebApplication1 | |
| @addTagHelper "*, Microsoft.AspNet.Mvc.TagHelpers" |
Secondly, the _Layout.cshtml that references our script tags and invokes the boot JavaScript to bootstrap our Angular2 component.
| <!DOCTYPE html> | |
| <html> | |
| <head> | |
| <meta charset="utf-8" /> | |
| <meta name="viewport" content="width=device-width, initial-scale=1.0" /> | |
| <title>@ViewData["Title"]</title> | |
| <environment names="Development"> | |
| <!-- Css --> | |
| <link rel="stylesheet" asp-href-include="~/css/*.css"> | |
| <!-- Js --> | |
| <script src="~/js/jquery.js"></script> | |
| <script src="~/js/bootstrap.js"></script> | |
| <script src="~/js/system.js"></script> | |
| <script src="~/js/rx.js"></script> | |
| <script src="~/js/typescript.js"></script> | |
| <script src="~/js/angular2/angular2.dev.js"></script> | |
| <script src="~/js/angular2/angular2-polyfills.js"></script> | |
| <script src="~/js/angular2/http.dev.js"></script> | |
| <script src="~/js/angular2/router.dev.js"></script> | |
| </environment> | |
| <environment names="Production"> | |
| <!-- Css --> | |
| <link rel="stylesheet" asp-href-include="~/css/*.min.css" asp-append-version="true"> | |
| <!-- Js --> | |
| <script src="~/js/jquery.min.js"></script> | |
| <script src="~/js/bootstrap.min.js"></script> | |
| <script src="~/js/system.min.js"></script> | |
| <script src="~/js/rx.min.js"></script> | |
| <script src="~/js/typescript.min.js"></script> | |
| <script src="~/js/angular2/angular2.dev.min.js"></script> | |
| <script src="~/js/angular2/angular2-polyfills.min.js"></script> | |
| <script src="~/js/angular2/http.dev.min.js"></script> | |
| <script src="~/js/angular2/router.dev.min.js"></script> | |
| </environment> | |
| <!-- Configure SystemJS --> | |
| <script> | |
| System.config({ | |
| packages: { | |
| app: { | |
| format: 'register', | |
| defaultExtension: 'js' | |
| } | |
| } | |
| }); | |
| System.import('app/boot') | |
| .then(null, console.error.bind(console)); | |
| </script> | |
| </head> | |
| <base href="/" /> | |
| <body> | |
| <div> | |
| @RenderBody() | |
| </div> | |
| </body> | |
| </html> |
Finally, the Index.cshtml which is rendered as the body of the layout and introduces an app element that will be detailed later.
| @{ | |
| ViewData["Title"] = "Angular 2"; | |
| } | |
| <app class="container" style="display: block;">Loading...</app> |
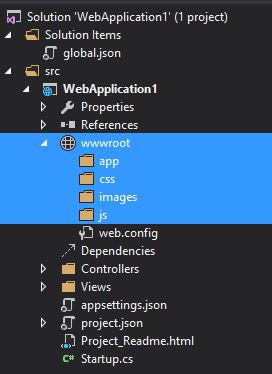
Now let’s get our webroot structure solidified, expand the wwwroot folder and add the folders depicted below. We will add to these later.
Open the project.json file and let’s paste in the following JSON. This will pull in the required dependencies we need for our starter application. The ‘dependencies’ are simply NuGet package references – be sure to paste everything defined below.
| { | |
| "version": "1.0.0-*", | |
| "compilationOptions": { | |
| "emitEntryPoint": true | |
| }, | |
| "dependencies": { | |
| "Microsoft.AspNet.Authentication.Cookies": "1.0.0-rc1-final", | |
| "Microsoft.AspNet.Diagnostics.Entity": "7.0.0-rc1-final", | |
| "Microsoft.AspNet.IISPlatformHandler": "1.0.0-rc1-final", | |
| "Microsoft.AspNet.Mvc": "6.0.0-rc1-final", | |
| "Microsoft.AspNet.Mvc.TagHelpers": "6.0.0-rc1-final", | |
| "Microsoft.AspNet.Server.Kestrel": "1.0.0-rc1-final", | |
| "Microsoft.AspNet.StaticFiles": "1.0.0-rc1-final", | |
| "Microsoft.AspNet.Tooling.Razor": "1.0.0-rc1-final", | |
| "Microsoft.Extensions.CodeGenerators.Mvc": "1.0.0-rc1-final", | |
| "Microsoft.Extensions.Configuration.FileProviderExtensions": "1.0.0-rc1-final", | |
| "Microsoft.Extensions.Configuration.Json": "1.0.0-rc1-final", | |
| "Microsoft.Extensions.Configuration.UserSecrets": "1.0.0-rc1-final", | |
| "Microsoft.Extensions.Logging": "1.0.0-rc1-final", | |
| "Microsoft.Extensions.Logging.Console": "1.0.0-rc1-final", | |
| "Microsoft.Extensions.Logging.Debug": "1.0.0-rc1-final", | |
| "Microsoft.VisualStudio.Web.BrowserLink.Loader": "14.0.0-rc1-final", | |
| "Glimpse": "2.0.0-beta1", | |
| "Microsoft.AspNet.Mvc.WebApiCompatShim": "6.0.0-rc1-final" | |
| }, | |
| "commands": { | |
| "web": "Microsoft.AspNet.Server.Kestrel" | |
| }, | |
| "frameworks": { | |
| "dnx46": { } | |
| }, | |
| "exclude": [ | |
| "wwwroot", | |
| "node_modules" | |
| ], | |
| "publishExclude": [ | |
| "**.user", | |
| "**.vspscc" | |
| ] | |
| } |
If you’re familiar with OWIN then the next steps will be very straightforward. Open the Startup.cs file., and let’s paste in some more source and discuss its purpose.
| using Glimpse; | |
| using Microsoft.AspNet.Builder; | |
| using Microsoft.AspNet.Hosting; | |
| using Microsoft.Extensions.Configuration; | |
| using Microsoft.Extensions.DependencyInjection; | |
| using Microsoft.Extensions.Logging; | |
| namespace WebApplication1 | |
| { | |
| public class Startup | |
| { | |
| // Entry point for the application. | |
| public static void Main(string[] args) => WebApplication.Run<Startup>(args); | |
| public Startup(IHostingEnvironment env) | |
| { | |
| // Set up configuration sources. | |
| var builder = new ConfigurationBuilder() | |
| .AddJsonFile("appsettings.json") | |
| .AddJsonFile($"appsettings.{env.EnvironmentName}.json", optional: true); | |
| builder.AddEnvironmentVariables(); | |
| Configuration = builder.Build(); | |
| } | |
| public IConfigurationRoot Configuration { get; set; } | |
| // This method gets called by the runtime. Use this method to add services to the container. | |
| public void ConfigureServices(IServiceCollection services) | |
| { | |
| services.AddGlimpse(); | |
| services.AddMvc(); | |
| } | |
| // This method gets called by the runtime. Use this method to configure the HTTP request pipeline. | |
| public void Configure(IApplicationBuilder app, | |
| IHostingEnvironment env, | |
| ILoggerFactory loggerFactory) | |
| { | |
| loggerFactory.AddConsole(Configuration.GetSection("Logging")); | |
| loggerFactory.AddDebug(); | |
| if (env.IsDevelopment()) | |
| { | |
| app.UseBrowserLink(); | |
| app.UseDeveloperExceptionPage(); | |
| } | |
| else | |
| { | |
| app.UseExceptionHandler("/Home/Error"); | |
| } | |
| app.UseIISPlatformHandler(options => | |
| options.AuthenticationDescriptions.Clear()); | |
| app.UseStaticFiles(); | |
| app.UseGlimpse(); | |
| app.UseMvc(routes => | |
| { | |
| routes.MapRoute("default", | |
| "{controller=Home}/{action=Index}/{id?}"); | |
| routes.MapRoute("spa-fallback", | |
| "{*anything}", | |
| new { controller = "Home", action = "Index" }); | |
| routes.MapWebApiRoute("defaultApi", | |
| "api/{controller}/{id?}"); | |
| }); | |
| } | |
| } | |
| } |
You might have noticed that in addition to a public void Configure method there is now a public void ConfigureServices method as well. Additionally, the Configure method now expects two new parameters, IHostingEnvironment and ILoggerFactory.
The typical usage pattern is that you invoke an Add* extension method in the ConfigureServices operation to add a service for consumption, while in the Configure operation you invoke the corresponding Use* extension method.
| public void ConfigureServices(IServiceCollection services) | |
| { | |
| services.AddGlimpse(); | |
| services.AddMvc(); | |
| } |
The pattern becomes obvious when you study the ConfigureServices source, notice how we are adding Glimpse and MVC to the IServiceCollection.
” Glimpse provides real time diagnostics & insights to the fingertips of hundreds of thousands of developers daily.
As you see below, within the Configure method now invokes the two corresponding methods – UseGlimpse and UseMvc.
| public void Configure(IApplicationBuilder app, | |
| IHostingEnvironment env, | |
| ILoggerFactory loggerFactory) | |
| { | |
| loggerFactory.AddConsole(Configuration.GetSection("Logging")); | |
| loggerFactory.AddDebug(); | |
| if (env.IsDevelopment()) | |
| { | |
| app.UseBrowserLink(); | |
| app.UseDeveloperExceptionPage(); | |
| } | |
| else | |
| { | |
| app.UseExceptionHandler("/Home/Error"); | |
| } | |
| app.UseIISPlatformHandler(options => | |
| options.AuthenticationDescriptions.Clear()); | |
| app.UseStaticFiles(); | |
| app.UseGlimpse(); | |
| app.UseMvc(routes => | |
| { | |
| routes.MapRoute("default", | |
| "{controller=Home}/{action=Index}/{id?}"); | |
| routes.MapRoute("spa-fallback", | |
| "{*anything}", | |
| new { controller = "Home", action = "Index" }); | |
| routes.MapWebApiRoute("defaultApi", | |
| "api/{controller}/{id?}"); | |
| }); | |
| } |
Avoid crossing your eyes while dotting your “t’s”
In other words, pay attention to what it is that you’re doing. A lot of what we have done thus far was simple MVC related and server-side, let’s now shift the attention to the client-side and how Angular2, TypeScript, Task Runners and npm will play a role.
Dependencies
While NuGet serves up our external executable packages, npm is responsible for managing our CSS and JavaScript dependencies. Being that we’re developing an Angular2 application we’ll need to pull in Angular2 as a dependency – in order to do that let’s take a look at the package.json, but first we need to create one.
Right click on project and select Add → New Item. From the Add New Item dialog select Installed → Client-side → NPM Configuration File. This will add the package.json file, replace its contents with the following:
| { | |
| "name": "Sample", | |
| "version": "0.0.1", | |
| "dependencies": { | |
| "angular2": "2.0.0-beta.0", | |
| "bootstrap": "3.3.6", | |
| "systemjs": "0.19.6", | |
| "es6-promise": "^3.0.2", | |
| "es6-shim": "^0.33.3", | |
| "reflect-metadata": "0.1.2", | |
| "rxjs": "5.0.0-beta.0", | |
| "zone.js": "0.5.10", | |
| "jquery": "2.1.4" | |
| }, | |
| "devDependencies": { | |
| "gulp": "3.8.11", | |
| "gulp-concat": "2.5.2", | |
| "gulp-cssmin": "0.1.7", | |
| "gulp-uglify": "1.2.0", | |
| "gulp-rename": "1.2.2", | |
| "rimraf": "2.2.8", | |
| "concurrently": "^1.0.0", | |
| "lite-server": "^1.3.1", | |
| "typescript": "^1.7.5", | |
| "lodash": "3.10.1" | |
| }, | |
| "scripts": { | |
| "tsc": "tsc", | |
| "tsc:w": "tsc -w", | |
| "lite": "lite-server", | |
| "start": " \"npm run tsc:w\" \"npm run lite\" " | |
| } | |
| } |
Note the different types of dependencies from the highlighted source above, one set of dependencies is explicitly for development only – meaning it is not part of what is served to clients in response to a web request. Among these development dependencies you’ll notice gulp a lot.
Task Runners
With the introduction of Visual Studio 2015 the notion of Task Runners is now supported. The Task Runner Explorer is a new window in which your task runner file tasks can be bound to IDE events.
Gulp

Gulp is one of two task runners now fully integrated and supported in the IDE. Gulp is a pre-processor for content delivery and if you’re familiar with the concept of MVC bundling, this is pretty much the same thing. Multiple files are input and the files are checked for errors, minified and delivered as a single file to the client.
Let’s add the following gulpfile.js to our project, Add → New Item. From the Add New Item dialog select Installed → Client-side → Gulp Configuration File.
| /// <binding BeforeBuild='default' /> | |
| "use strict"; | |
| var _ = require('lodash'), | |
| gulp = require('gulp'), | |
| uglify = require('gulp-uglify'), | |
| cssmin = require('gulp-cssmin'), | |
| rename = require('gulp-rename'); | |
| var angularJs = [ | |
| './node_modules/angular2/bundles/angular2.dev.js', | |
| './node_modules/angular2/bundles/router.dev.js', | |
| './node_modules/angular2/bundles/angular2-polyfills.js', | |
| './node_modules/angular2/bundles/http.dev.js' | |
| ]; | |
| var js = [ | |
| './node_modules/bootstrap/dist/js/bootstrap.js', | |
| './node_modules/systemjs/dist/system.js', | |
| './node_modules/rxjs/bundles/Rx.js', | |
| './node_modules/typescript/lib/typescript.js', | |
| './node_modules/jquery/dist/jquery.js' | |
| ]; | |
| var css = [ | |
| './node_modules/bootstrap/dist/css/bootstrap.css' | |
| ]; | |
| var fonts = [ | |
| './node_modules/bootstrap/dist/fonts/*.*' | |
| ]; | |
| gulp.task('copy-js', function () { | |
| _.forEach(js, function (file, _) { | |
| gulp.src(file) | |
| .pipe(gulp.dest('./wwwroot/js')) | |
| }); | |
| _.forEach(angularJs, function (file, _) { | |
| gulp.src(file) | |
| .pipe(gulp.dest('./wwwroot/js/angular2')) | |
| }); | |
| }); | |
| gulp.task('copy-min-js', function () { | |
| _.forEach(js, function (file, _) { | |
| gulp.src(file) | |
| .pipe(uglify()) | |
| .pipe(rename({ extname: '.min.js' })) | |
| .pipe(gulp.dest('./wwwroot/js')) | |
| }); | |
| _.forEach(angularJs, function (file, _) { | |
| gulp.src(file) | |
| .pipe(uglify()) | |
| .pipe(rename({ extname: '.min.js' })) | |
| .pipe(gulp.dest('./wwwroot/js/angular2')) | |
| }); | |
| }); | |
| gulp.task('copy-css', function () { | |
| _.forEach(css, function (file, _) { | |
| gulp.src(file) | |
| .pipe(gulp.dest('./wwwroot/css')) | |
| }); | |
| _.forEach(fonts, function (file, _) { | |
| gulp.src(file) | |
| .pipe(gulp.dest('./wwwroot/fonts')) | |
| }); | |
| }); | |
| gulp.task('copy-min-css', function () { | |
| _.forEach(css, function (file, _) { | |
| gulp.src(file) | |
| .pipe(cssmin()) | |
| .pipe(rename({ extname: '.min.css' })) | |
| .pipe(gulp.dest('./wwwroot/css')) | |
| }); | |
| _.forEach(fonts, function (file, _) { | |
| gulp.src(file) | |
| .pipe(gulp.dest('./wwwroot/fonts')) | |
| }); | |
| }); | |
| gulp.task('default', ['copy-js', 'copy-css']); | |
| gulp.task('minify', ['copy-min-js', 'copy-min-css']); |
Most (if not all) of the Gulp source code should be easy to read and comprehend. We are simply defining several tasks that can be bound to IDE events. We require several JS libraries that were referenced in our devDependencies, then we simply author the desired functionality into each named task by utilizing the fluent API that Gulp provides for chaining methods together.
There are four events that you can tether tasks to, three of which are technically build-events and the other is not.
| Event | Description |
|---|---|
Before Build |
Executes bound gulp task(s) before compilation |
After Build |
Executes bound gulp task(s) after compilation |
Clean |
Executes bound gulp task(s) after the Clean finishes |
Project Open |
Executes bound gulp task(s) while project is opening |
We have bound our default task to the “Before Build” event. These tasks copy over the dependencies our application relies on to run.
Angular2
Angular2 is simply the second version of the AngularJS.
” Angular is a development platform for building mobile and desktop web applications.
In our wwwroot we expect the following folder structure, where the wwwroot\app is the only place in which we manually manipulate source code. The other folders should be left alone as our Gulp task will copy over our dependencies as needed into the other directories.
.
├── app [ working directory ]
│    └── components
├── css
├── fonts
├── images
└── js
    └── angular2
Let’s start by adding our boot.ts file. This file will bootstrap our main entry point for Angular2 to initialize and act on. Additionally this will define our Router and Http Providers. The MVC _Layout.cshtml has a script tag that invokes this file.
| import {bootstrap} from "angular2/platform/browser" | |
| import {ROUTER_PROVIDERS} from "angular2/router"; | |
| import {HTTP_PROVIDERS} from "angular2/http"; | |
| import {AppComponent} from "./app.component" | |
| bootstrap(AppComponent, [ROUTER_PROVIDERS, HTTP_PROVIDERS]); |
We will now need to define our AppComponent, add a new TypeScript file namely app.component.ts to the wwwroot\app directory. It should contain the following:
| import {Component, OnInit} from "angular2/core"; | |
| import {AsyncRoute, Router, RouteDefinition, RouteConfig, Location, ROUTER_DIRECTIVES} from "angular2/router"; | |
| import {StaticComponent} from "./components/static.component"; | |
| declare var System: any; | |
| @Component({ | |
| selector: "app", | |
| templateUrl: "/app/app.html", | |
| directives: [ROUTER_DIRECTIVES] | |
| }) | |
| export class AppComponent implements OnInit { | |
| public routes: RouteDefinition[] = null; | |
| constructor(private router: Router, | |
| private location: Location) { | |
| } | |
| ngOnInit() { | |
| if (this.routes === null) { | |
| this.routes = [ | |
| { path: "/index", component: StaticComponent, name: "Index", useAsDefault: true }, | |
| new AsyncRoute({ | |
| path: "/sub", | |
| name: "Sub", | |
| loader: () => System.import("app/components/mvc.component").then(c => c["MvcComponent"]) | |
| }), | |
| new AsyncRoute({ | |
| path: "/numbers", | |
| name: "Numbers", | |
| loader: () => System.import("app/components/api.component").then(c => c["ApiComponent"]) | |
| }) | |
| ]; | |
| this.router.config(this.routes); | |
| } | |
| } | |
| getLinkStyle(route: RouteDefinition) { | |
| return this.location.path().indexOf(route.path) > -1; | |
| } | |
| } |
With our AppComponent created, we’ll need to create our app.html. This will serve as the template for the menu structure and view-port if you will of our application. There is a direct correlation that I need to call attention to, for each RouteDefinition there is a menu item in our HTML that is rendered. When a route-link is clicked Angular2 loads the component declared in the route definition and renders its HTML in place of the route-outlet tag.
| <div class="page-header"> | |
| <h1> | |
| MVC, Angular2 | |
| <br> | |
| <small>Sample</small> | |
| </h1> | |
| </div> | |
| <nav class="navbar navbar-inverse"> | |
| <div class="container-fluid"> | |
| <div class="navbar-header"> | |
| <a class="navbar-brand" href="#"> | |
| <span class="glyphicon glyphicon-sunglasses"></span> | |
| </a> | |
| </div> | |
| <ul *ngIf="routes != null" class="nav navbar-nav"> | |
| <li *ngFor="#rt of routes" [class.active]="getLinkStyle(rt)"> | |
| <a [routerLink]="[rt.name]">{{rt.name}}</a> | |
| </li> | |
| </ul> | |
| </div> | |
| </nav> | |
| <div class="content padding has-header"> | |
| <router-outlet></router-outlet> | |
| </div> |
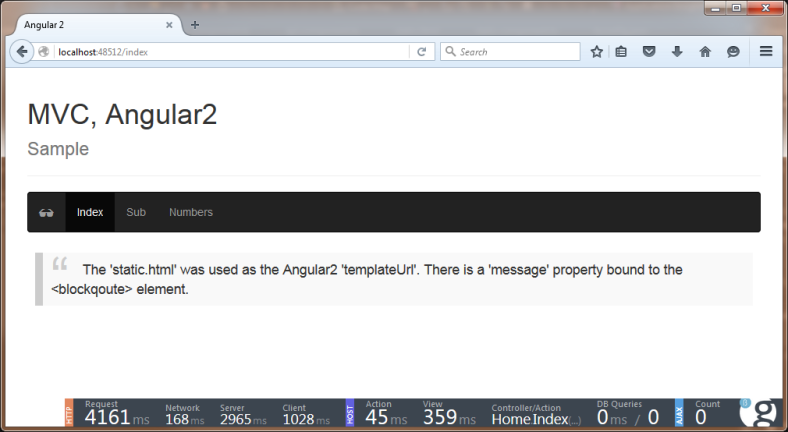
Static HTML ‘templateUrl’
For this sample application, I will demonstrate how to utilize static .html and MVC partial view pre-processing for our Angular2 component “templateUrl’s”. Additionally, I’ll demonstrate a simply Web API 2 call as well. You may have noticed that we have several components that we have references to within the app.component that we have yet to create, let’s do that now.
First add static.component.ts and static.html under the wwwroot\app\components directory.
| import {Component, OnInit} from "angular2/core"; | |
| @Component({ | |
| selector: "static", | |
| templateUrl: "app/components/static.html" | |
| }) | |
| export class StaticComponent implements OnInit { | |
| message: string; | |
| constructor() { } | |
| ngOnInit() { | |
| this.message = "The 'static.html' was used as the Angular2 'templateUrl'. There is a 'message' property bound to the <blockqoute> element." | |
| } | |
| } |
Notice the selector and templateUrl? The selector is actually the CSS selector Angular2 uses to find the DOM element in which the templateUrl will replace once rendered. Here is the .html, as you can see very simple.
| <static> | |
| <blockquote>{{message}}</blockquote> | |
| </static> |
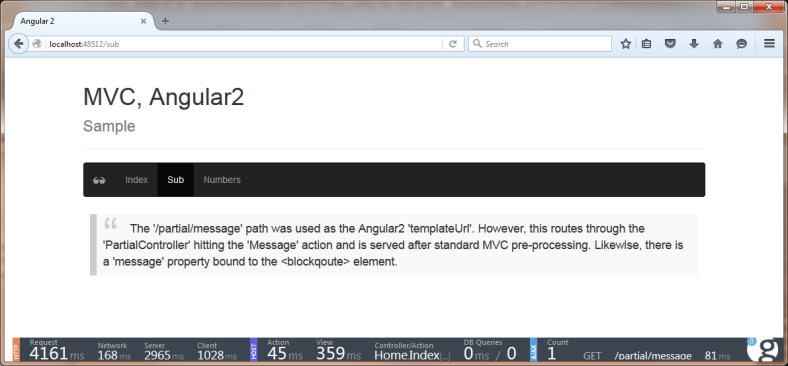
MVC Partial View ‘templateUrl’
We can utilize the power of MVC’s pre-processing capabilities and have a Controller who is responsible for serving up partial views. This is great since we can then utilize MVC templating in conjunction with Angular2 templating. Add yet another new TypeScript file named mvc.component.ts.
| import {Component, OnInit} from "angular2/core"; | |
| @Component({ | |
| selector: "mvc", | |
| templateUrl: "/partial/message" | |
| }) | |
| export class MvcComponent implements OnInit { | |
| message: string; | |
| constructor() { } | |
| ngOnInit() { | |
| this.message = "The '/partial/message' path was used as the Angular2 'templateUrl'. However, this routes through the 'PartialController' hitting the 'Message' action and is served after standard MVC pre-processing. Likewise, there is a 'message' property bound to the <blockqoute> element." | |
| } | |
| } |
Notice that our syntax has changed ever so slightly for the templateUrl, this is actually pointing to an MVC partial view that we’re going to create right now. Create a new folder under Views, name it “Partial”. Then add a new MVC View Page, naming it Message.cshtml.
| @{ | |
| ViewBag.Title = "MVC"; | |
| } | |
| <mvc> | |
| <blockquote *ngIf="message">{{message}}</blockquote> | |
| </mvc> |
The markup is nearly identical, but the implementation is vastly different. We’ll need the corresponding Controller to serve up these requests. Add a PartialController with two entry points, the second of which will become obvious in our next step.
| using Microsoft.AspNet.Mvc; | |
| namespace WebApplication1.Controllers | |
| { | |
| public class PartialController : Controller | |
| { | |
| public IActionResult Message() => PartialView(); | |
| public IActionResult Numbers() => PartialView(); | |
| } | |
| } |
I love the one-liner syntax that a simple lambda expression provides with C# 6!
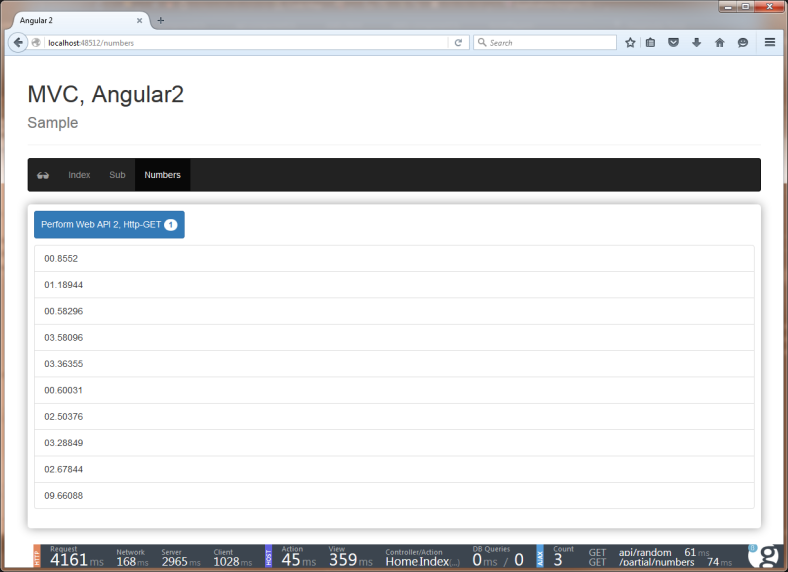
Web API 2 and Angular2’s Http
Adding another MVC View Page to our newly created Views\Partial directory, let’s call it Numbers.cshtml. The markup has several key bindings to an Angular2 component that we will need to define.
| @{ | |
| ViewBag.Title = "API"; | |
| } | |
| <numbers> | |
| <style> | |
| .grey-border { | |
| margin-top: 20px; | |
| padding: 10px; | |
| -webkit-box-shadow: 0 0 15px #999; | |
| box-shadow: 0 0 15px #999; | |
| border-radius: 5px; | |
| } | |
| button { | |
| padding: 10px; | |
| margin-bottom: 10px; | |
| } | |
| </style> | |
| <div class="grey-border"> | |
| <button type="button" (click)="get()" class="btn btn-primary"> | |
| Perform Web API 2, Http-GET <span class="badge">{{apiOccurances}}</span> | |
| </button> | |
| <span *ngIf="isLoading">Loading...</span> | |
| <div class="list-group" *ngIf="data != null"> | |
| <li class="list-group-item" *ngFor="#num of data">{{ num | number:'2.3-5' }}</li> | |
| </div> | |
| </div> | |
| </numbers> |
Back over in our wwwroot\app\components, we will need to obviously add our api.component.ts but also an api.service.ts that will encapsulate our Web API 2 call via Angular2’s Http library.
| import {Component, OnInit} from "angular2/core"; | |
| import {CORE_DIRECTIVES} from "angular2/src/common/directives/core_directives"; | |
| import {ApiService} from "./api.service"; | |
| @Component({ | |
| selector: "numbers", | |
| templateUrl: "/partial/numbers", | |
| providers: [ApiService], | |
| directives: CORE_DIRECTIVES | |
| }) | |
| export class ApiComponent implements OnInit { | |
| apiOccurances: number = 0; | |
| data: number[]; | |
| isLoading: boolean = false; | |
| constructor(private service: ApiService) { } | |
| ngOnInit() { | |
| this.get(); | |
| } | |
| get() { | |
| this.isLoading = true; | |
| this.service.get(json => { | |
| if (json) { | |
| this.data = json.numbers; | |
| this.isLoading = false; | |
| this.apiOccurances++; | |
| } | |
| }); | |
| } | |
| } |
Our ApiComponent gets injected with an instance of our ApiService and defines a few simple members that are bound to the Numbers.cshtml markup.
| import "rxjs/Rx" | |
| import {Http} from "angular2/http"; | |
| import {Injectable} from "angular2/core"; | |
| @Injectable() | |
| export class ApiService { | |
| constructor(private http: Http) { } | |
| get(onNext: (json: any) => void) { | |
| this.http.get("api/random").map(response => response.json()).subscribe(onNext); | |
| } | |
| } |
I’m simply ecstatic that there was a change to move away from the Promise model to the Observable model instead. Anytime I get to work with Reactive Programming paradigm, I learn something new. Angular2’s Http library is based on the observable programming model and relies on RxJS. I invite you to read how Angular2 works with observables here but simply put, you subscribe to the Observable passing it the observerOrNext (and optionally error and complete) functions.
All we need now is a Web API 2 controller that will serve up the HttpGet that ApiService expects at “api/random”. Fortunately for us this has been dramatically simplified with ASP.NET Core 1.0. No more woes with System.Web.Mvc vs. System.Web.Http.
” Now, you can create a single web application that handles the Web UI and data services without needing to reconcile differences in these programming frameworks.
| using System; | |
| using System.Linq; | |
| using System.Threading.Tasks; | |
| using Microsoft.AspNet.Mvc; | |
| namespace WebApplication1.Controllers | |
| { | |
| [Route("api/[controller]")] | |
| public class RandomController : Controller | |
| { | |
| [HttpGet] | |
| public async Task<JsonResult> Get() | |
| { | |
| var rand = new Random(); | |
| await Task.Delay(rand.Next(0, 50)); // Emulate tiny latency... | |
| return new JsonResult(new { | |
| numbers = Enumerable.Range(1, 10) | |
| .Select(i => i * rand.NextDouble()) | |
| .ToArray() | |
| }); | |
| } | |
| } | |
| } |
Notice that there is no ApiController inheritance, and both the MVC and Web API controllers are simply inheriting from Controller.
Conclusion
You should be able to clone the repository locally, build it and play around. I encourage you to do so and hope that you find the sample source fun and the tutorial surrounding it useful. Today we discussed some of the capabilities of ASP.NET Core 1.0 (previously known as ASP.NET 5), MVC 6, Web API 2, Angular2 and TypeScript. I leave you with one question, “tomorrow, what will you do with it?”.
References
- https://angular.io/
- http://reactivex.io/
- http://docs.asp.net/en/latest/conceptual-overview/aspnet.html
- http://docs.asp.net/en/latest/dnx/overview.html
- http://weblogs.asp.net/scottgu/introducing-asp-net-5
- https://nodejs.org/en/
- https://en.wikipedia.org/wiki/Highlander_(film)
- http://getglimpse.com/
- https://github.com/angular/angular

For those that have NPM installed in their x86 directory, update Visual Studio’s node.cmd to point to that folder instead. @”C:\Program Files (x86)\nodejs\node.exe” “C:\Program Files (x86)\nodejs\node_modules\npm\bin\npm-cli.js” %*
LikeLike
Nice catch!
LikeLike
Hi – thanks for this. I have tried to run it locally but just get “Loading …” message on blank screen. Any ideas what could be the problem. I have downloaded the application from Github as is. Same problem when I create the code as per your instructions.
Regards
Martin
LikeLike
Hi Martin,
This means that for some odd reason Angular2 isn’t loading, this can be a result of several things. The “Loading” text is within the
Index.cshtmlview, and Angular2 comes into play to select the “app” element and replace its contents — but if Angular2 isn’t there, it can’t. Here is what I would look for… For starters, ensure that thenpmis working correctly, i.e.; that you have anode_modulesdirectory and that all the dependencies called out in thepackage.jsonare existent. Next, ensure thatgulpcorrectly moves the dependencies into yourwwwrootdirectory. If these are working correctly, great! If you’re still having and issue, you may have to try debugging it — I always suggest chrome, but firefox is okay too — I suggest not using IE. If you’re still having the issue, what the developer tool say, press F12 and let me know the error.LikeLiked by 1 person
Hi David,
Thanks for posting this article. I downloaded your sample. Shouldn’t there a boot.ts file in the solution? However there is a boot.js file.
Thanks
LikeLike
Yes, the sample actually has a few missing
.tsfiles and the.jsand.mapfiles shouldn’t be in source control. I just recently realized that and meant to fix it… Thanks for the reminder.LikeLike
I’m encountering a “cannot find module” errors (e.g. angular2/core) for each of the .ts files described in the tutorial (e.g. boot.ts). I see angular2 in the node_modules folder on disk, however I noticed the gulpfile.js is referencing a /bundles/ folder that does not exist on disk in the angular2 folder. Did I miss a step that creates the bundles folder? Or is something else causing the angular2 modules to not be found by ts?
LikeLike
Hi Sean,
There are a few things to consider:
At the root of the project, open a command line window — run an
npm install. What are the results, does it seems as though it adds the expected files? It should…Thegulpfile.jsis simply a task to move the files on disc to the appropriate folders in thewwwroot— if for some odd reason the files are not loaded fromnpmthen you could simply locate them and then put them where they need to go. Are you certain that you followed one of the earlier steps in which you alteredVisual Studio'spointer tonpm? This is somewhat vital to ensuring thatnpmis the latest version.Let me know what you find and I’ll try helping from there…BTW — thanks for taking the time to work through the tutorial, I hope it is helpful!
Thanks
LikeLike
I am having the same problems like Sean:
all the imports from “angular2/… seem not to work.
I called npm install on the root folder of the project and everything worked fine (after some problems with node-gyp).
It seems that all angular2 files exist on my file system, but somehow visual studio does not find the files.
Why are there only 4 *.js files in the angular2 folder in the solution (router.dev.js, http.dev.js,…) and not all the others?
Thx, I appreciate your blog post!
LikeLike
Hi Thomas,
I hadn’t heard back from Sean, so I assumed that my suggestions panned out and it worked for him (or so I hoped). I ran into some issues too with
node-gyp— and that was kind of a bad experience. Afternpmis happy you should be able to runnpm installwithout errors. Now forgulp, if you are seeing four*.jsfiles in thejs/angular2directory you should be golden. Those are the onlyangular2files you need for the solution I provided. I took a minimalistic approach, if you look @ the_Layout.cshtmlyou’ll notice that in the<environment>tag, I have a finite number of script references. Let me know if this helps…Thanks,
Cheers
LikeLike
I got halfway then .. Severity Code Description Project File Line Suppression State
Error TS1148 Cannot compile modules unless the ‘–module’ flag is provided. AngTest C:\Users\punkouter\Downloads\AngTest\src\AngTest\wwwroot\app\app.component.ts 1 Active
But the complete project works so maybe I can use that as my start off point atleast
LikeLike
Nice catch! I didn’t call attention to the
tsconfig.jsonwhich is completely an oversight on my part. It is the configuration forTypeScriptLikeLike
Hi David, just one question,
Does it change anything with TS 1.8? There are some breaking changes but I don’t know if these affect what you explain in this post.
Thanks!
LikeLike
Hi Pablo,
Yes, with
TS 1.8there are breaking changes — this is kind of expected since I wrote this app knowing full well that the technologies were all in either beta or release candidates. I think specific to theTS 1.8you need to addtypings, I simply haven’t had time to address this yet but I plan to.Thanks for calling attention to that…
David
LikeLike
Thanks for the article and sample but i am getting an error appsettings.json could not be found , i tried to add it manually but didnt work . error is thrown from stratup.cs at this line var builder = new ConfigurationBuilder()… could you help??
LikeLike
I just double checked, the file is in fact there and where it should be. Here is the actual file location https://github.com/IEvangelist/MvcAngular2/blob/master/WebApplication1/src/WebApplication1/appsettings.json. What error specifically are you getting?
LikeLiked by 1 person
Actually error is coming from my test project when i followed your article, i didn’t add appsettings.json as i thought it will be created automatically but didnt work… so i used inbuilt mvc 6 web application (which comes with appsettings.json) template and its working… but in an empty template do we need to add appsettings.json or is it created automatically from startup.cs and if yes then what could go wrong any ideas?
LikeLike
Ah, okay — now I see the problem. The
appsettings.jsonis in fact the application settings that you need to maintain yourself. It is much like the legacyappsettingssection of theweb.config. When you start from an empty solution it is not created for you.LikeLiked by 1 person
Thanks a lot , actually i was looking for it in client-side files, now its working well …. your article helped me a lot 🙂
LikeLike
I followed your steps and ran into an issue when trying to run the application, downloaded your source and hit the same issue. Wondering if anyone else is seeing it. I hit an exception trying to load system-polyfills.js. When I manually add the missing file there is an issue with the same object being declared twice. I suspect it is angular versions of polyfill. Wondering if I am having a load order issue and it reverts to the system-polyfill.js when it can’t find the angular version. Anyone else have an issue like this?
LikeLike
Hi Gogana,
Sorry for the delay. This sounds like perhaps you have the latest version of the
Angular2beta perhaps, or that your version ofTypeScriptis more recent? There are known issues withtypings, once you get into the later versions of both. These are going to be resolved, but that is where I would start looking.Thanks!
LikeLike